springboot에서 H2 데이터베이스 연동
스프링부트에 H2 디비를 연동한다. 다중 데이터베이스 연결을 지원하기 위해서 맵퍼 어노테이션을 이용한다.
의존성 추가 pom.xml
1
2
3
4
5
<dependency>
	<groupId>com.h2database</groupId>
	<artifactId>h2</artifactId>
	<scope>runtime</scope>
</dependency>
프로퍼티 설정 application.properties
1
2
3
4
5
6
7
8
spring.datasource.hikari.jdbc-url=jdbc:h2:mem:test;MODE=PostgreSQL;DB_CLOSE_DELAY=-1;DB_CLOSE_ON_EXIT=FALSE
spring.datasource.hikari.username=sa
spring.datasource.hikari.password=
spring.datasource.hikari.driver-class-name=org.h2.Driver
spring.datasource.hikari.maximum-pool-size=100
spring.datasource.hikari.connection-test-query=SELECT 1
spring.datasource.hikari.minimum-idle=5
spring.datasource.hikari.connection-timeout=100000
application-local-db.properties
H2용 맵퍼 어노테이션 생성
다중 데이터베이스 소스에 연결할 수 있도록 맵퍼 어노테이션을 정의하여 맵퍼에서 이용한다. 나중에 새로운 디비 연결을 추가하기가 용이해진다.
1
2
3
4
5
6
7
@Target({ ElementType.TYPE })
@Retention(RetentionPolicy.RUNTIME)
@Documented
@Component
public @interface DbH2ConnMapper {
	String value() default "";
}
H2용 맵퍼 어노테이션과 연동되는 디비 연결을 설정한다.
1
2
3
4
5
6
7
8
@Configuration
@MapperScan(basePackages =  "io.github.ttallaemideul.**"
	, annotationClass = DbH2ConnMapper.class
	, sqlSessionFactoryRef = "dbH2SessionFactory")
@EnableTransactionManagement
public class DbH2DatabaseConfig {
...
}
스프링부트 어플리케이션이 기동될 때 테이블을 생성하고 초기 데이터를 생성하도록 초기화코드를 추가한다.
1
2
3
4
5
6
7
8
9
10
11
@Bean(name="dbH2DataSourceInitializer")
public DataSourceInitializer dataSourceInitializer(@Qualifier("dbH2DataSource") DataSource datasource) {
	ResourceDatabasePopulator resourceDatabasePopulator = new ResourceDatabasePopulator();
	resourceDatabasePopulator.addScript(new ClassPathResource("config/database/h2-schema.sql"));
	resourceDatabasePopulator.addScript(new ClassPathResource("config/database/h2-data.sql"));

	DataSourceInitializer dataSourceInitializer = new DataSourceInitializer();
	dataSourceInitializer.setDataSource(datasource);
	dataSourceInitializer.setDatabasePopulator(resourceDatabasePopulator);
	return dataSourceInitializer;
}
맵퍼 생성
H2 디비에 쿼리를 실행하는 맵퍼 인터페이스를 생성한다. 앞에서 정의한 @DbH2ConnMapper 어노테이션을 추가했기 때문에 H2 디비에서 쿼리가 실행된다.
1
2
3
4
5
6
@DbH2ConnMapper
public interface H2MapperH2 {

	public Date getServerNow();
	public List<Map<String, Object>> getUsers();
}
thymeleaf th:each로 목록 표시
배열 형태의 객체는 타임리프의 th:each로 표시할 수 있다.
컨트롤러에서 List로 뷰에 users 객체를 전달한다. 이 객체는 사용자 목록을 가지고 있다.
1
2
3
4
5
6
7
8
9
10
@GetMapping
public String main(Model model) {
	List<Map<String, Object>> users = h2Service.getUsers();
	if(log.isDebugEnabled()) {
		log.debug("users={}", users);
	}
	model.addAttribute("serverNow", h2Service.getServerNow());
	model.addAttribute("users", users);
	return "sample/h2/main";
}
타임리프 th:each="user : ${users}" 태그는 ${users} 목록의 객체 하나씩을 user 객체로 세팅하여 루프에서 사용하도록 한다.
1
2
3
4
5
6
7
<tr th:each="user : ${users}">
  <td th:text="${user.USERID}">USERID</td>
  <td th:text="${user.FIRST_NAME}">first_name</td>
  <td th:text="${user.LAST_NAME}">last_name</td>
  <td th:text="${user.EMAIL}">email</td>
  <td th:text="${user.REG_DT}">reg_dt</td>
</tr>
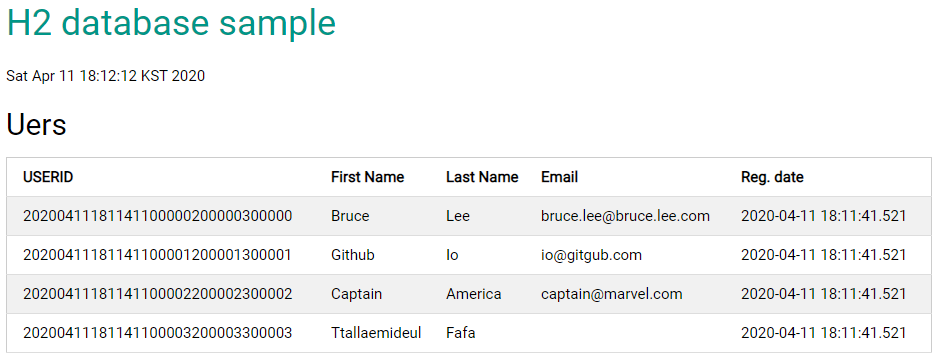
최종적으로 아래와 같은 화면이 구현된다.

샘플 프로젝트
아래 샘플 소스코드에서 이 문서에서 설명한 소스를 확인할 수 있다. 프로젝트를 받아서 직접 빌드하여 실행하고 결과를 확인해보면 도움이 될 것이다.